How to Get Started in Brick Laying

Brick laying is an art and takes a lot of practice to get right. Follow Brick Layer Perth to get started with this rewarding skill.

First, mark out a straight line on the ground. This will be the guideline for your brick wall. Next, place all of your materials within proximity.

Brick Layer

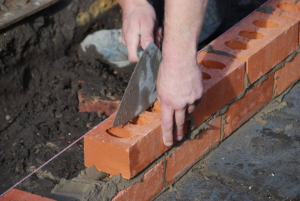
Having the right tools is crucial for bricklayers. Many different construction tools are used in the job, each with its purpose. A bricklayer’s trowel is perhaps the most essential tool for the job as it handles and spreads the mortar between the bricks.

Other important construction tools include a line block and mason’s line, which are both used to keep rows of bricks aligned straight. These are hammered into the ground or brick course to anchor the line and ensure it is not moved while working.

A pointing trowel is also an essential tool for bricklaying. This is a smaller trowel with a pointed end that allows the bricklayer to smooth out the mortar joints between bricks. A curved edging trowel is another construction tool that is useful for bricklaying as it has a rounded end and can be used to make a neater finish to the wall.

It is important for bricklayers to have a good pair of gloves and eye protection when handling the mortar as it contains lime, which can cause burns if in contact with skin. A dust mask or respirator is also recommended as it helps prevent inhaling the mortar mix.

A tarpaulin is also a vital tool for protecting the workspace from rain or other weather. Keeping the work area clean and covered will help keep the bricklayers dry and protect the bricks from moisture damage. Lastly, it is important for bricklayers to have access to a range of safety gear, including hard hats, dust masks and steel-toe boots. For more information about working as a bricklayer or to find out about available job opportunities, contact the professional recruiters at .

Bricklayers work on a range of projects, from building small garden walls to installing the façade of an office block. This trade requires a range of materials to complete the project, including cement, mortar and bricks. A bricklayer must also have a number of other tools and materials to perform the job effectively. This includes a trowel, spirit level, bolster chisel, lump hammer and gloves. The bricklayer should use these tools to prepare the site and lay the first course of bricks.

The first bricks to be laid should be positioned with the frog, or indentation, facing upwards, as this helps to ensure that the masonry is strong and long-lasting. The bricks should be tapped gently to ‘bed in’, before the next full brick is placed atop it. The bricks should be staggered on each course to prevent the joints lining up with one another, as this can weaken the structure of the wall.

Once the first course is down, a spirit level can be used to check that it is level along its length. The mortar can then be mixed, and the bricklayer can start to lay the second course of bricks. A good bricklayer will not try to be fast, as real speed comes from efficiency of movement and a sense of rhythm.

A variety of bricklaying patterns can be used, but the herringbone pattern is particularly popular. This pattern is relatively simple to learn and is useful for beginners as it allows the use of different types of bricks to create a pleasing design. The herringbone pattern can also be used to add a decorative touch, such as on chimneys and walls.

Brick laying can be a fun and rewarding DIY project. However, there are a few important points to bear in mind before undertaking the task yourself or hiring a mason. Masonry requires a certain degree of skill and knowledge that not all homeowners have. Before attempting to lay brick, learn about the most common brick patterns and make sure you have the right tools for the job.

Start by digging a trench to the desired length of your wall. It should be at least as deep as the bricks you will be using and ideally it should be twice as wide. This will give you a firm and solid foundation for your wall to sit on.

Next, mix the mortar. This is a mixture of sand and masonry cement that must be the correct consistency to create a strong and long-lasting brick wall. Typically, three parts sand and one part cement is used with water to achieve the required consistency. Mix the mortar on an old board until it is a smooth, creamy texture that slides easily off the shovel.

When the mortar is ready, butter up the end of your first brick and place it into position on the mortar bed. It is best to have the ‘header’ face of the brick (the textured side) facing upwards, this will ensure that the mortar reaches and bonds correctly with it.

Once the first brick is in place, use your spirit level to check that it is at a level height. Then, take a trowel and create a V-shaped trough along the top of the brick to ‘bed it in’. After this, use your string line to create a guideline for the rest of your brick wall and scrape away any excess mortar.

If you’re new to bricklaying, it can be overwhelming at first. However, with a bit of practice and the right tools, you can master this beautiful trade. All you need is some good mortar mix, a trowel and bricks to get started.

Start by constructing your foundation row and ensuring that it is as level as possible. Then, spread a thin layer of mortar on top and set your first course of bricks. It’s important to make sure that your bricks are evenly spaced so that the wall will be strong and structurally sound. Use a mason’s line or spirit level to verify the height of each brick.

After your first course is laid, you should begin racking the ends of your wall by building up the piers at either end of your new brick structure. Racking ensures that the next courses of bricks are built up at a uniform height and also makes it easier to lay your wall’s joints.

Once your racked ends are complete, you can build up your wall using the stepped leads and standard bricks to achieve your desired height. If you are building a single-skin stretcher bond wall, then the first courses of bricks should alternate between headers and stretchers. If you’re constructing a Flemish bond wall, then the first course of bricks should be begun with a header and the second course should be started half a brick into the head.

Once your racking and first course of bricks are in place, you should mark up 65mm lines at both ends of the wall to indicate where each row (also known as a course) should be. Then, set a string line between the two gauging rods to act as your guide for laying your bricks. Make sure the line is tight and secure, and check it with a spirit level to confirm that it is straight. You will need to move this line up with every new row you build.

The final stages of bricklaying are essential to ensure a solid, long-lasting structure. The right mortar mix, accurate measurements and blending of materials, and meticulous attention to detail all contribute to the strength, stability, and aesthetic appeal of a brick wall.

The first step is to prepare the bricks by soaking them in water. This will prevent them from absorbing too much of the mortar and weakening the wall. Once the bricks are saturated, they should be laid in the desired pattern.

A good brick laying technique is to stagger the vertical joints, especially when extending or infilling a wall. This will strengthen the wall and prevent the wavy appearance that can occur when all courses of brick are laid at the same time. It is also important to use bricks that match in size, as well as the face height, length and color of the existing wall.

Once the foundation or footing has been laid, the mason can begin the first course of bricks. It is important to lay the bricks squarely and with a level and to carefully follow the string line. The first brick should be tapped down slightly with the trowel handle to ‘bed in’ the mortar, and then checked with the level to make sure it is straight. The second brick should be ‘buttered up’ by spreading 10mm of mortar on the end of the brick that will be pushed against the first brick.

After the next brick is ‘buttered up,’ it should be placed in position and pressed down gently with the trowel handle to ensure that it is firmly joined to the adjacent brick. Once the brick is set, the mortar should be cleaned off any excess with the trowel handle.

Heater Repair – How to Spot Common Problems With Your Thermostat

A heating system that works appropriately keeps your home comfortable during winter. If your heater isn’t working correctly, it may need to be repaired or replaced.

Heater Repair

Keeping up with basic maintenance tasks will help extend the life of your heater. However, there are some warning signs that you should watch out for. These include a lack of warm air, strange noises, and shorter heating cycles. Contact Heater Repair Los Angeles for professional help.

The thermostat is the brains behind your heating system. Understanding how it works can help you spot issues with the device before calling for Heater repair services. Thermostats are susceptible to a variety of problems, but many of these can be resolved with simple DIY steps.

The first sign of a problem with your thermostat is when the digital display goes dark. This means that the thermostat is no longer receiving power and needs new batteries. If you’re unsure how to replace the batteries, consult your user manual for guidance. Once the batteries are replaced, your thermostat should return to normal functionality.

Another common cause of a malfunctioning thermostat is a tripped circuit breaker. The breaker in your electrical panel controls the amount of electricity that is supplied to the thermostat. When a breaker trips, it interrupts the flow of electricity and stops your HVAC from functioning. To fix this, simply locate the breaker in your electrical panel that is dedicated to your thermostat and switch it back on.

A faulty sensor can also be the cause of a thermostat’s failure to function properly. This can occur if the sensor is obstructed, dirty, or damaged. If you suspect this to be the issue, consult your user manual for assistance locating the sensor and ensuring that it is clean, unobstructed, and free from damage.

The final common thermostat problem is a lack of proper connection between the thermostat and fan. This can be caused by a loose or broken wire, a corroded terminal screw, or an improperly configured wiring. If you are comfortable working with electrical components, you can manually test the connections by shutting off the power and removing the thermostat cover. Next, use canned air or a soft artist brush to clear the cover of any accumulated dust and dirt that may be impeding the thermostat’s ability to send signals to the fan.

Low Airflow

A common issue that can lead to an emergency heating repair is a lack of air flow. This is a big problem because the heating system needs to work hard and use more energy if it doesn’t get enough air to circulate. This will cause the heater to break down or overheat. Over time, it could also lead to a dangerous situation like carbon monoxide leaks.

The main cause of low air flow is a dirty or clogged air filter that restricts the flow of air through the system. It’s a good idea to change or clean your air filter every month or so to keep it from becoming too clogged and blocking the flow of air. Another cause of low airflow is a broken blower fan that’s not pushing the heated air out of your house through the ductwork.

Furnaces are forced-air systems that use a fan to distribute the heat they create throughout your home. The fan is responsible for blowing the warm air into your rooms, so if it’s not working properly, your entire house won’t be warm. A lack of airflow also means your furnace will need to work longer and harder to warm up your home, which will increase your monthly energy bills.

You might also notice that some rooms in your house are much colder than others, which is usually a sign that there is a problem with the damper valves. The only way to diagnose this is by having a professional HVAC technician perform an inspection and make the necessary repairs. If you smell a musty or burning odor, it’s a good indicator that there is an electrical or other type of problem with your heating system.

Strange Noises

Strange sounds that don’t usually occur from your heater could be a sign that it needs to be repaired. While a low humming sound is typically associated with heater operation, any other noises should be considered a warning signal that something is wrong with your system. If ignored, these sounds can lead to a more severe system breakdown and expensive repairs.

If you hear rattling sounds coming from your heating system, it is a good idea to have a professional inspect the situation as soon as possible. Rattling is generally a sign that there are loose panels or other components in the system. This can create a potential fire hazard and may also allow dangerous carbon monoxide to leak into your home.

Screeching and scraping sounds are also bad news for your heater. This sounds like metal grinding against metal and can indicate that the blower fan is loose and dragging on other parts of the system or that bolts have come loose in the motor compartment. It could also be a sign that the bearings are dry and need routine lubrication.

If you hear a loud banging sound when you turn on your furnace, this is an indication that the ignition or pilot light has malfunctioned. This is a serious problem that requires immediate attention from a professional because it can lead to an explosion of your entire system.

High Energy Bills

If your energy bills are skyrocketing, there’s a good chance that your heater is the culprit. In addition to the age of appliances, your furnace may be running inefficiently, and a professional inspection can help you identify problems such as a thermostat wired incorrectly or dust deposits that reduce efficiency.

Regular maintenance is the best way to prevent energy-wasting issues, which can lead to high electricity bills. For example, your HVAC system won’t run efficiently with a dirty air filter and should be cleaned quarterly to improve performance. One yearly heating tune-up also helps keep your energy costs under control by identifying and repairing any potential problems before they impact the system.

Investing in smart thermostats and duct sealing can also significantly cut your electricity costs. These upgrades allow for precise temperature control, remote access through smartphone apps, and energy-saving scheduling. Adding home insulation is another excellent way to lower your energy consumption. It keeps warm air from escaping through walls and ceilings, and nine out of 10 homes are under-insulated.

In many cases, high energy bills are related to simple maintenance tasks that people often neglect or forget. For instance, it’s critical to change the air filter in your HVAC system on a regular basis and to have your system professionally inspected once per year to ensure that it is operating efficiently. It is also wise to have any leaking windows or doors caulked to stop precious heated air from escaping your home. If you do this, you’ll be surprised at how much your energy bills will decrease.

Dust Deposits

Dust can be a major problem for any heater, especially when it gets into places it shouldn’t. One of the biggest problems is that dust can block or hinder the flow of air into your system, reducing its efficiency and creating other issues like clogged filters.

Dirty ducts are another huge issue. Your ducts are the vessel through which air moves throughout your home, and they’re naturally going to pick up a lot of dust, hair, microorganisms, pet dander, and other particulates from the air. If you haven’t cleaned your ducts in a while, these particles are going to bypass your air filter and end up inside your furnace and its various components, where they can build up and cause all sorts of problems.

Look around your ductwork for signs of dust, which can be easy to spot. You may see dusty, fuzzy areas around your vents or a musty or burning smell. If you notice any of these, schedule a tune-up to clean your ducts and seal any leaks.

When you do, expect reduced energy bills thanks to increased efficiency and a cleaner, healthier, more comfortable home. You’ll also cut down on any issues that can be caused by clogged or blocked ducts, such as musty or burning odors and carbon monoxide leaks.

What Is Water Damage Restoration?

Water Damage Restoration Utah involves a comprehensive process to ensure that your home is safe and healthy for occupants. This includes having your property inspected by professional experts who use advanced equipment, such as hygrometers and moisture detectors.

Water Damage Restoration

After the inspection, your restoration company will start drying the affected area. This will prevent structural damage, bad odors, and mold growth.

Water removal is a key step in any water damage restoration project. Standing water can cause serious problems, and mold and mildew only take a few days to grow. That’s why contacting a certified IICRC professional as soon as possible is important.

Once the water is removed, a team of experienced professionals will assess the damage. They may use moisture meters and thermal imaging cameras to ensure all areas are dry before restoration begins. In some cases, removing and replacing severely damaged materials, like drywall and flooring, may be necessary.

This is the most crucial step of any water damage restoration project, as it can prevent further damage to your home or business. It’s also when professionals can evaluate the situation and determine how much of your property needs to be restored.

A professional water restoration team will use various tools to remove as much water as possible from impacted areas, including wet/dry vacuums, submersible pumps, commercial fans, and dehumidifiers. They will also use hygrometers and moisture meters to detect hidden pockets of water.

If addressed, water damage can lead to significant structural damage and rot. During the water mitigation phase, service contractors will focus on preventing damage by removing affected materials like flooring and drywall. They will also tarp off or contain other areas that could spread water throughout the building.

Once the drywall and flooring are removed, they will be sanitized using antibacterial treatments. They will then begin drying, which can take days or even weeks. In addition to using commercial fans and dehumidifiers, they will also open windows to promote evaporation.

Dehumidification is the process of removing excess moisture from building materials. It is an important part of the water damage restoration process because it prevents mold and microbial growth. It can also reduce energy costs and improve indoor air quality. In addition, it can help prevent corrosion and structural damage in the long run.

There are several different methods for dehumidification, including the use of a commercial dehumidifier and air-moving equipment. In most cases, the goal is to get the moisture content down to 50% or less. However, it is not always possible to completely remove the moisture from wet materials. Regardless of the method used, it is important to dehumidify as quickly as possible to avoid further damage to the property and its contents.

To determine how much moisture is present in wet walls, technicians use various tools, such as non-invasive moisture meters and infrared imaging cameras. The IR camera detects water evaporation in wet walls by measuring the temperature differences between damp and dry walls. It can also identify any microbial contamination. Once the professionals know how much water is in the walls, they can dry them using specialized equipment.

Porous materials exposed to high moisture levels should be discarded, as they may have hidden microbial contamination or structural problems. Other materials that are not porous can be salvaged with cleaning, disinfecting, and drying processes. Using appropriate cleaning products and safe equipment for the specific material is important.

The disinfection process involves spraying surfaces and objects with chemicals (disinfectants) to kill germs that may have been on them. The disinfectants are usually left on the surfaces and objects for a set time to ensure they’re fully killed. Disinfection is vital to water damage restoration as it can prevent illness and disease from germs like bacteria, fungi, and mold.

The first step in disinfection is to assess the water damage and look for signs of mold and other contaminants. Once the professionals have evaluated the water damage, they’ll turn off any power in the area and remove standing water. They’ll also use air movers to speed up the drying process and dehumidifiers to help reduce moisture in the air.

Once the area has been dried, the water remediation company will work to preserve as much of your personal property as possible. They’ll use foam, abrasive, and immersion cleaning methods to clean and sanitize items thoroughly. They’ll also use moisture meters to check the home’s humidity levels and identify hidden moisture areas.

If any materials cannot be saved, they’ll be removed immediately. This will prevent them from being further damaged or becoming a breeding ground for mold and other contaminants. Mold and fungal growth can lead to illness in humans and animals, so these health hazards must be eliminated immediately. This is why it’s so important to choose a professional who is IICRC-certified and follows the best industry practices.

Mold is a common problem that arises from water damage in homes. If left untreated, mold can lead to health problems for those with compromised immune systems and respiratory issues like asthma. Typically, mold will grow in areas of your home with high humidity and moisture, such as crawlspaces and behind walls. Mold is also a sign of severe water damage and can cause structural damage to your home, like buckled drywall.

While some types of mold are toxic, most can be removed using household cleaning products. If you are still determining the type of mold growing in your home, call your insurance agent to schedule an inspection and mold testing. A certified professional will test the mold for spores and determine the level of contamination.

Regardless of what caused the mold, addressing the problem as quickly as possible is important. The longer you wait, the more damage the mold will do and the harder it will be to remove.

The most important step is removing and replacing anything that was damaged by the water damage, as well as ensuring that all materials are dry and ready for restoration. This includes carpets, curtains, rugs, furniture and clothing. Moving any items that cannot be saved outside or to a nearby room is important to prevent mold and mildew from growing.

To eliminate mold in your home, use a solution of 34 cups of chlorine bleach per gallon of warm water on large surface areas of affected rooms and a sponge or cleaning brush to scrub. Wear rubber gloves when handling the stains, and rinse the area with clean water after scrubbing.

Before the water restoration process begins, your home must be prepared. This involves protecting and bagging items that can’t be saved, identifying the source of water intrusion, turning off supply lines, and contacting your insurance company. If you’re insured, the insurance company will send an adjuster to assess the damage and determine if your policy covers it.

Once the water source has been identified and stopped, the water damage restoration professionals can begin their work. They’ll start by assessing the damage to your home, including looking for signs of mold, evaluating the materials’ condition, and determining the best way to dry out the property. They may even recommend removing some materials, such as drywall down to the studs or carpeting down to the subfloor.

Water restoration companies will typically use air movers and dehumidifiers to remove moisture from the air. This can take several days, depending on the amount of water and how long it’s been sitting in the area. It’s also common for the water restoration team to use antimicrobial agents to prevent or destroy any mold spores that may be present.

Once the water and mold have been removed, your home will be restored to its original state. This can include cosmetic touch-ups, furniture cleaning and resetting, carpeting, rug cleaning, and repairs to building materials, such as drywall and baseboards. Some restoration companies can handle the initial water mitigation and construction work, simplifying the process for homeowners. If you need water cleanup, contact a local IICRC-certified professional to help you recover from your emergency. CFRS is available 24/7 and can begin restoring your home as soon as possible.